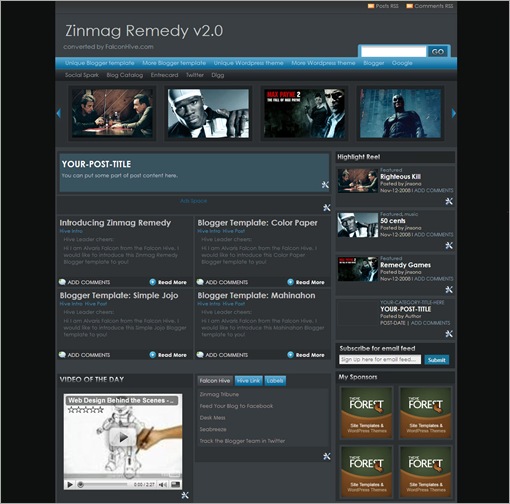
Zinmag Remedy 2.0 is the enhanced version of the Zinmag Remedy Blogger template, which is now SEO fixed and 99% widgetized. Experience the free yet massively improved Remedy and make it your real professional template!
SEO Fixed
As SEO is very important for the serious Blogger, we have rechecked the template and worked out our best to fix every possible SEO issue. We have improved the ‘h tag’ of the Remedy template, and probably rearrange the code to make its structure completely similar to standard template, Minima’s structure.99% Widgetized
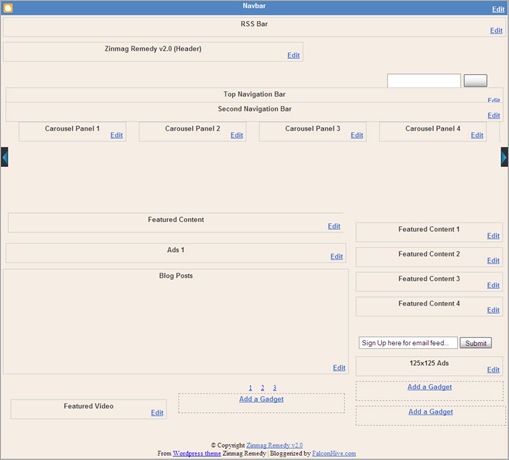
Over the month, we published Blogger template that needs you to setup it in ‘Edit HTML’ section that often cause unpredictable error and is uneasy for beginner. For Remedy 2.0, we have widgetized all the part from the top navigation bar to the bottom tabber section. You can now wipe out all your worries and just customize Remedy in Page Element section!Improved CSS and Template Structure
We have modified the template’s CSS code to fix some issues like misaligned image in the ads space on the main page. We have also made some modifications on JavaScript/ HTML gadget to make your customization faster and easier.New Layout view

You can observe the demo and download the Zinmag Remedy 2.0 Blogger template.
Set up the RSS Bar
You can customize the RSS bar to your own preferred RSS link. To achieve this, access into ‘Layout’ and under the ‘Page Element’ section, click on the ‘Edit’ of the ‘Top Navigation Bar’ and configure the Link Gadget setup. You can copy and paste the link below into the Link Gadget and edit it to become your post RSS and comment RSS.Comments RSS:
[code lang="xml"]YOUR-BLOG-ADDRESS/feeds/comments/default[/code]
Posts RSS:
[code lang="xml"]YOUR-BLOG-ADDRESS/feeds/posts/default[/code]
Set up the Top Navigation Bar
You can customize your header navigation link to your own preferred link. To achieve this, access into ‘Layout’ and under the ‘Page Element’ section, click on the ‘Edit’ of the ‘Top Navigation Bar’ and configure the Link Gadget setup.Set up the Second Navigation Bar
You can customize your header navigation link to your own preferred link. To achieve this, access into ‘Layout’ and under the ‘Page Element’ section, click on the ‘Edit’ of the ‘Second Navigation Bar’ and configure the Link Gadget setup.Set up the Ads Space
You can setup the ads space with any kind of ads. To get the ads displayed, access into ‘Layout’ and under the ‘Page Element’ section, click on the ‘Edit’ of the ‘Ads Space’, copy code below and edit it with corresponding item:[code lang="xml"]
 [/code]
Set up the ‘Carousal Panel’ on the top of the main page
You can see this template got a sliding carousal of featured post image on the top of the page, which can be configured through ‘Carousel Panel’ section. Simply access into ‘Layout’ and under the ‘Page Element’ tab, click on the ‘Edit’ of the ‘Carousel Panel 1′, copy and paste the code below and edit it with corresponding item. You can also use the same step above to configure the Carousel panel 2, 3 and so on.[code lang="xml"]
 [/code]
Set up the Featured Content section
There’s also got a wide space under the sliding carousal, which you can access into the space through the ‘Page Element’ section. Simply copy the code below, then access into ‘Layout’ and under the ‘Page Element’, click on the ‘Edit’ of the ‘Featured Content’, paste and edit the code with the corresponding item.[code lang="xml"]
YOUR-POST-TITLE
You can put some part of post content here.
[/code]
Set up the Main Page’s Ads Space
Zinmag Remedy template got an ads space under the top featured content section, and you can setup the ads space with Google Adsense Ad Unit 468×15 Ads. To achieve this, simply access into ‘Layout’ and under the ‘Page Element’ tab, click on the ‘Edit’ of the ‘Ads 1′, copy and paste your Adsense or ads code then ‘Save’ to show the ads.Hide article’s content on the main page
As this template got ‘Read More’ function, you probably want to hide some text from being displayed on the main page. In fact, you just need some extremely easy step to achieve this. Simply copy the highlighted code below, then access into ‘Settings’ and under the ‘Formatting’ tab, paste the code into the ‘Post Template’.On the next time you write an article, you just need to add this line of code to hide the text.
Set up the ‘Video of the day’
There’s a video section on the bottom of the mini post section, and you can put favorite Youtube video inside the section by just few simple steps.To setup your favorite Youtube video, just copy the video’s embed code link, then access into ‘Layout’ and under the ‘Page Element’ tab, click on the ‘Edit’ of the ‘Featured Video’, paste the code then ‘Save’ to show the video!
Your Youtube video’s embed code link is located be
low the profile of the video uploader, and you can adjust the (embed)’s width and height inside the code to fix the section size. The recommended width and height for the video is 295 and 239.
Set up the Tabber

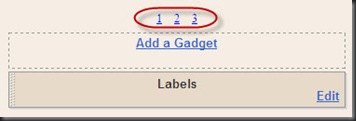
You can probably notice that there’s got gadget with number ’1′, ’2′ and ’3′ in the layout. By clicking the ’1′, you can actually set up the first part of the tabber with any gadget, same as clicking ’2′ and ’3′, which directs you to the setting of second and third part of the tabber.
Set up the ‘Featured Content 1′ section
There’s actually got another featured content section installed on the top of the sidebar.To setup the featured content on the sidebar, simply copy the code below, then access into ‘Layout’ and under the ‘Page Element’ tab, click on the ‘Edit’ of the ‘Featured Content 1′, paste and edit the code with the corresponding item. You can also use the same step above to configure the featured content 2, 3 and so on.[code lang="xml"]
YOUR-POST-TITLE
Posted by Author
[/code]
Set up the 125×125 Ads
You can change the 125×125 ads image to your own ads image. To achieve this, simply copy the code below and access into ‘Layout’ and under ‘Page Element’ tab, click on the ‘Edit’ of the ’125×125 Ads’, paste and edit the code with corresponding item.[code lang="xml"]
Set up the Email Subscribe button
You can personalize the email subscribe button to your own personal RSS. To get this done, you have to sign up the Google Feedburner account first to get the Email Subscription link. Your email subscription link should looks like the code below:[code lang="xml"]http://feedburner.google.com/fb/a/mailverify?uri=ZinmagRemedyV20&loc=en_US[/code]
Simply copy the subscription link, access into ‘Layout’ and under the ‘Edit HTML’ tab, press [CTRL+F3] to find the code below and edit it with corresponding item.
[code lang="xml"]